Account
Using this feature, you can set up the following Telegram notifications:
– notification of a new invoice from the administration;
– reminder about an unpaid invoice;
– reminder that the paid period is ending;
– notification that an order has been suspended;
– warning that an overdue order will soon be deleted;
– notification of new tickets and ticket replies;
To set up notifications, follow these steps:
Step 1. Log in to your personal account.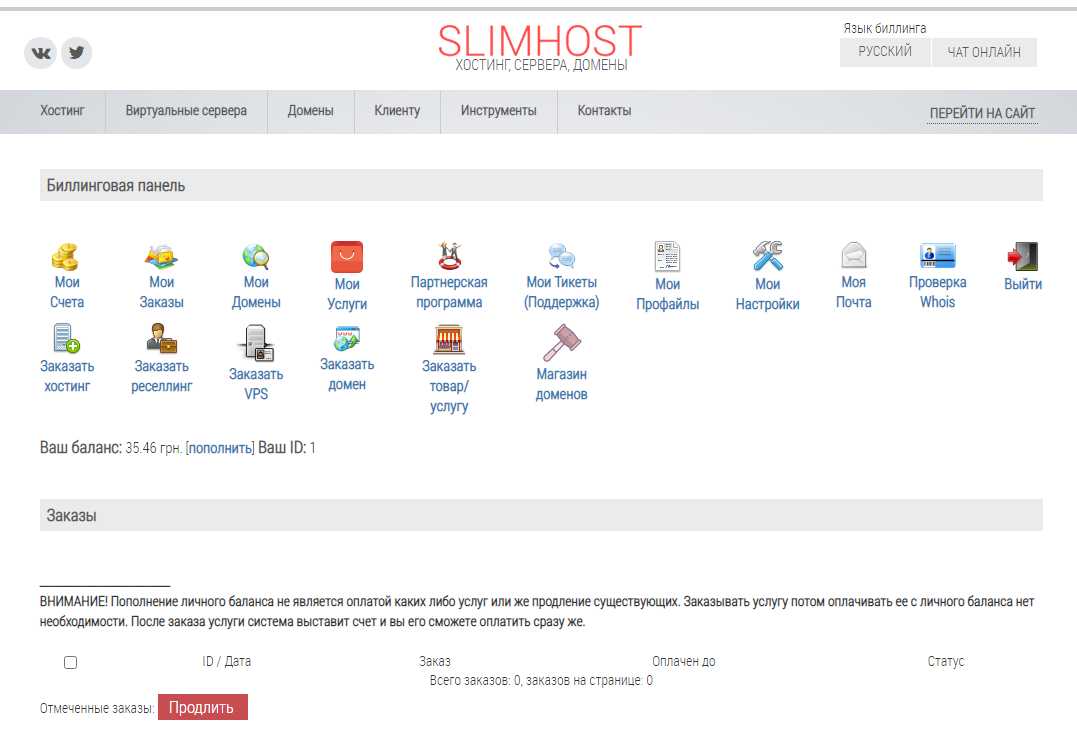
Step 2. Go to My Settings.
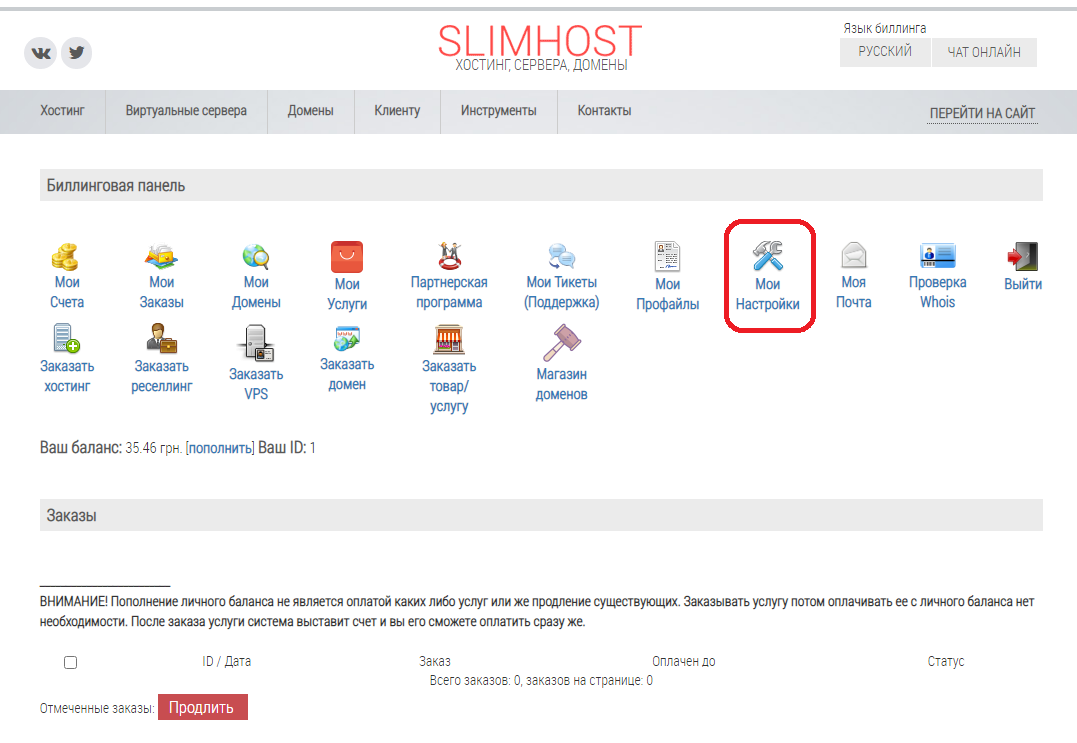
Step 3. Click “Add Telegram”.

Step 4. Follow the instructions that appear at the top of the window (the code to send to the bot will be unique to you).

Once you’ve completed these steps, you’ll start receiving notifications in Telegram.
DNS
The “DNS Records Management” menu supports the following record types: A, MX, CNAME, TXT.
Domain
If you did not receive the activation/renewal SMS code for a domain in the pp.ua zone, you can activate the domain an alternative way.
To do this, you need to have the Telegram messenger installed on your phone. Or use the WEB version at https://web.telegram.org
For authorization, use the phone number specified in the
domain owner’s data at registration.
You can get the code in Telegram using the @ppuabot bot. To do this, follow the link — https://t.me/ppuabot — or find it using search. Then click the “Start” button or send the /start command.
Note that the Telegram account must be registered to the phone number specified in the registrant’s (owner’s) data.

Next, select the “Activate domain” function.
Then review the .PP.UA domain policy and the agreement on providing contact data. Then click the “Yes” button.
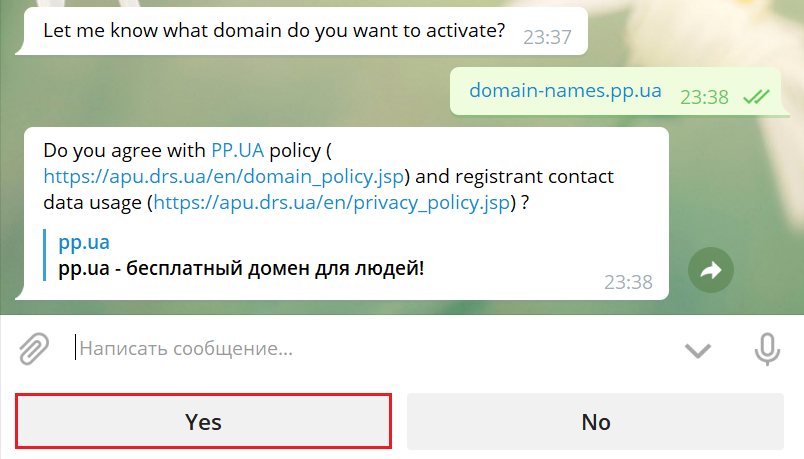
You will then receive a code and a link from the bot to the form for activating the domain name.
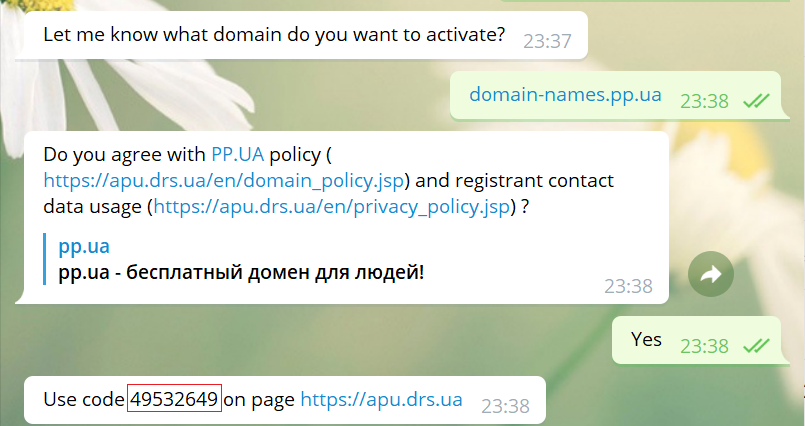
Please note: requests to the .PP.UA registry are only valid for five days. If activation is not completed within 5 days, the request will be rejected and the desired changes will not take place (domain registration/renewal/owner change or data edit).
After these steps, the domain will be activated automatically.
If you need to make changes to your domain’s registration records or change the Name Servers, you can do this yourself in your billing system account.
If, in the whois of a domain in an international zone, you see these DNS servers instead of yours:
Name Server: NS1.VERIFICATION-HOLD.SUSPENDED-DOMAIN.COM Name Server: NS2.VERIFICATION-HOLD.SUSPENDED-DOMAIN.COM
you need to verify ownership of the domain via your contact email (a verification link was sent to it)
More details:
Please note that when registering a domain name in an international zone, as well as when receiving administration rights from another person or changing contact details, you must verify the legitimacy and accuracy of the email address specified in the registration data. You were sent a notification with a link to verify your email address.
If the link is not followed within 14 days of the first notification being sent, the domain name will be SUSPENDED.
The domain can only be unsuspended after the registrant re-verifies their email address.
The notification is sent 3 times over 14 days. Verification is MANDATORY for all domain names in international zones.
Domain Transfer To/From Us
To transfer a domain, you will need to complete the following steps:
- Contact your current registrar and request a transfer code (auth code). If the domain has the “clientTransferProhibited” lock set, ask the registrar to change the domain status to “Ok”
- Submit a domain name transfer request to us in the billing panel. During checkout, the system will ask you to enter the transfer code.
- After completing these steps, the system will send a request to transfer the domain name.
Our identifiers:
SLIMHOST-MNT-CUNIC
To transfer a domain, you will need to take the following steps:
- Contact your current registrar and ask them to issue a transfer code (auth code), and also to change the status: clientTransferProhibited parameter to status: ok, i.e. to allow the domain name transfer.
- Place a domain transfer order to us in the billing panel. During the ordering process, the system will ask you to enter the transfer code.
- Pay for the domain transfer. The transfer price includes a 1-year domain renewal.
- After these steps, the system will send a domain transfer request.
Our identifiers:
LLC “Ukrainian Internet Names Center”
ua.ukrnames
To transfer a domain name from us to another registrar, you need to:
- Create a ticket in your personal account with the subject “Transfer of domain name (domain name) to another registrar”
- In the ticket body, write “Please issue a transfer code for the domain name(s) (domain name), and also allow the domain name transfer to another registrar (if a transfer lock is set)”
- A technical specialist will send you the transfer code. You’ll then be able to submit a domain transfer request with the other registrar.
To transfer a domain, you will need to take the following steps:
- Contact your current registrar and ask them to issue a transfer code (auth code). If a “clientTransferProhibited” transfer lock is set, ask the registrar to change the domain’s status to “Ok”
- Place a domain transfer order to us in the billing panel. During the ordering process, the system will ask you to enter the transfer code.
- Pay for the domain transfer. The transfer price includes a 1-year domain renewal.
- After these steps, the system will send a domain transfer request.
Our identifiers:
LLC “UKRAINIAN INTERNET NAMES CENTER”
dp.ukrnames
To transfer a domain, you will need to take the following steps:
- Contact your current registrar and ask them to issue a transfer code (auth code), and also to change the status: clientTransferProhibited parameter to status: ok, i.e. to allow the domain name transfer.
- Place a domain transfer order to us in the billing panel. During the ordering process, the system will ask you to enter the transfer code.
- Pay for the domain transfer. The transfer price includes a 1-year domain renewal.
- After these steps, the system will send a domain transfer request.
Our identifiers:
LLC “UKRNAMES DATACENTER”
co.ukrnames
Hosting
Depending on the DB driver used (mysql or mysqli), you need to find the following lines in the file /libraries/joomla/database/database/mysql.php
or /libraries/joomla/database/database/mysqli.php
return ($verParts[0] == 5 || ($verParts[0] == 4 && $verParts[1] == 1 && (int)$verParts[2] >= 2));
and replace them with:
//return ($verParts[0] == 5 || ($verParts[0] == 4 && $verParts[1] == 1 && (int)$verParts[2] >= 2));
return (1);
After the changes, the function should look like this:
function hasUTF()
{
$verParts = explode( '.', $this->getVersion() );
//return ($verParts[0] == 5 || ($verParts[0] == 4 && $verParts[1] == 1 && (int)$verParts[2] >= 2));
return (1);
}
Save the changes. We recommend updating the CMS to the latest version.
Yes, you can change your plan at any time. This service is free. You only pay for the cost of the plan itself!
Yes, our servers support Cyrillic domains.
Let’s look at common errors that occur after migrating a WordPress site.
1. Error establishing a database connection.
Incorrect database connection details specified in the wp-config.php file.
2. The WordPress installation page opens.
The database specified in wp-config.php is empty or has no WP installation records.
3. A welcome page opens.
Delete the index.html file in your site’s root directory.
4. Forbidden. You don’t have permission to access / on this server.
The site’s root directory is empty or doesn’t exist.
5. The site’s pages don’t open, while the homepage opens without errors.
Most likely, the .htaccess file with pretty-URL rules is missing.
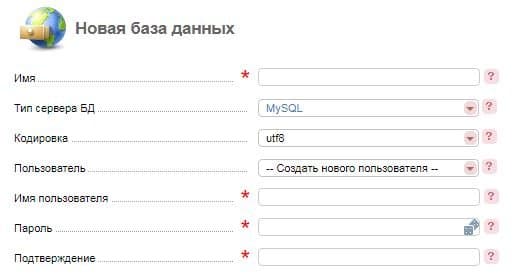
To create a database, go to the Databases section and click the Create button
Specify the database name, the required encoding, a user (create a new one or select an existing one), and generate a password.
To disable magic_quotes_gpc, add this line to your .htaccess file
php_value magic_quotes_gpc 0
Or in the php.ini file located at: ~/php-bin
Add the following: magic_quotes_gpc = Off
How to disable OPcache (if the site shows outdated data)
Sometimes a site may display outdated information due to server-side caching (OPcache).
What you need to do:
- Go to the site’s root directory (usually the
public_htmlfolder) - Create a
.user.inifile - Add this line to the file:
opcache.enable=0
Parameter values:
- 0 — OPcache disabled
- 1 — OPcache enabled
After that:
- Wait 1–5 minutes
- Clear your browser cache
- Refresh the site page
For the DLE CMS to work properly, it’s recommended to disable output buffering.
To do this, add this line to your .htaccess file
php_flag output_buffering off
GZIP compression is a technology that compresses text files when they’re transferred between the server and your browser. Every file has a certain size, and the smaller it is, the faster the server can send it to your computer. All modern browsers support this technology, so enabling this option can significantly speed up page loading in your browser.
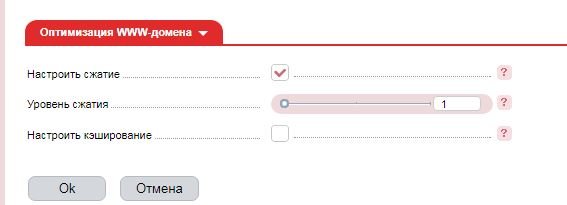
To enable compression in the ISPmanager panel, go to the WWW Domains section. Select the domain you need and click the Edit button
Then find WWW Domain Optimization and check the box next to
Specify the compression level (available values from 1 to 9)
After configuring, click the OK button
To see how much your site’s data was compressed, you can visit a special service
You can run PHP scripts at a specified time with the frequency you want.
Examples of running your scripts:
/usr/bin/wget -O /dev/null -q http://your_domain/file_name.php
or
/usr/bin/lynx -dump http://your_domain/file_name.php > /dev/null
another way
/usr/bin/curl –silent http://www.your_domain/file_name.php > /dev/null
If the script uses require or include functions with relative paths specified, use a call to the chdir() function at the start of the script to set the current working directory.
Then you can run the script like this:
/usr/bin/php -q $HOME/script.php > /dev/null 2>&1
$HOME — needs to be replaced with /var/www/username/path_to_script/script.php
Work on creating your account will begin immediately after payment is received.
Search engines can create a heavy load.
To solve the problem, add a Crawl-delay directive to robots.txt.
The Crawl-delay directive tells the search bot to load your site’s pages with an interval of at least 15 seconds, in other words, to pause while indexing the site’s pages.
Example
In your site’s root, create a robots.txt file and add:
User-agent: *
Crawl-delay: 15
You can find our DNS records in the email you received right after your hosting was activated.
Two data transfer modes are used for transferring files via FTP:
Text (ASCII) — used for transferring text files, PHP scripts, HTML files, Perl scripts
Binary (bin) — mode for transferring images, compiled CGI applications, and files encrypted with Zend Encoder
The registration procedure involves filling out the registration form on our site. You can order hosting in the Hosting section.
To order a domain, go to the domain registration section
Virtual Servers
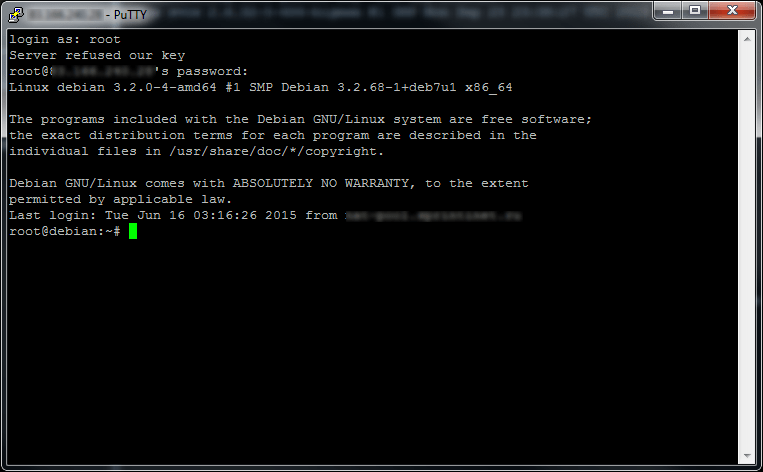
To remotely manage a VPS running a Linux-family OS, you need to use any SSH client, such as PuTTY.
Download the application from the official site https://putty.org
Launch PuTTY, and in the window that appears, in the «Host Name (or IP address)» field, enter your VDS’s IP address, then click the «Open» button:
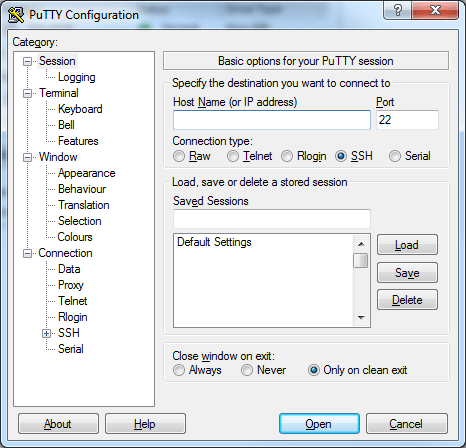
The SSH console for your VPS will then open, where you need to enter your username and password:
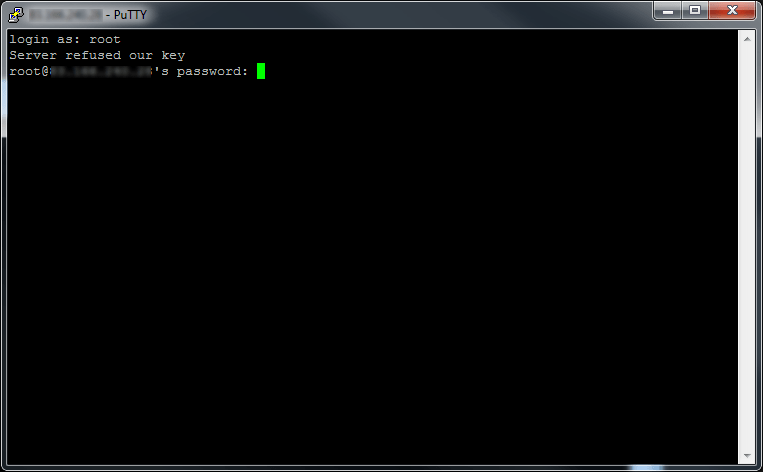
If authorization is successful, you’ll get a management console for your VPS: